
How to Build Halloween Props
Severed Head
Items Needed:
Mask
Football
Hat or Wig
Plastic Light Up Eyeballs
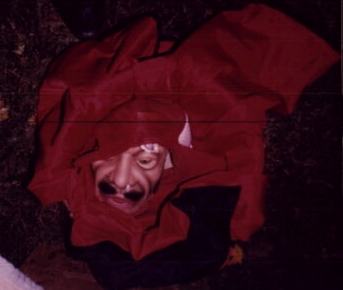
I used a very cheap mask from Walgreens that they had on sale one year for a 2/$100 sale. However, nearly any mask will due. The more it looks "human", the scarier the effect becomes. I then tape the mask to the football with heavy duty tape. I bought plastic battery powered eyeballs which are meant to go in a pumpkin and cut the battery case off. I then taped the eyeballs in to the eye-sockets of the mask. Cover with a hat or wig and set on a shelf! This prop is so simple, my little brother assembles it for me when we get out our decorations.
Lamp-Post Scarecrow

Items Needed:
Lamp Post
Old Clothes
Broom Handle or Stick
Bag, Sheet, Cloth, or similar to use for a head.
Garbage Bags for Legs
Duct Tape
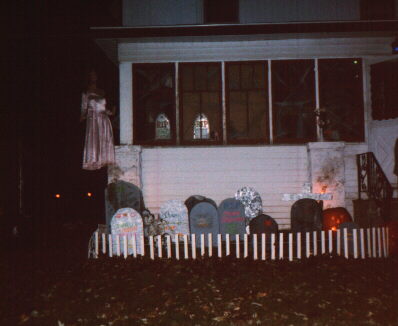
A broom handle is taped to the post at about arm height. The light becomes the head of the scarecrow. It is covered with a burlap sack but can be improvised by using cloth, an old sheet, a plastic bag, or anything you can think of. The face is made with a plastic "Scary Tree Faces" wrap around that was bought at Walgreens. For a cheaper version, the face can be made from shapes cut out of construction paper and taped to the head portion. A broom handle is then placed through a hole going through the pole. If your post does not have a hole, Duct Taping it to the pole also works. Place an old shirt over the broom, using the broom as the arms. On mine, a scarf was used at the neck to hold up the shirt and to cover parts of the lamp post. Legs are made from garbage bags filled with newspaper and Duct Taped to the pole. (Note: a similar, cheaper option is to throw a sheet over the lamp, tie a rope around it, and call it a ghost!)
Tombstones and Cemetary
Items Needed:
Anything you can find to resemble a Tombstone!
The Cemetary is fenced in using a wooden garden fence bought for about $10 at Wal-Mart. The fire in the background is made with cheap citranella torches that can be bought at any store in the garden section for a few bucks. We began our cemetary in 1994 with three plastic store bought tombstones (look in the windows of the image to see plastic tombstones). We painted them ourselves with flourescent paint and stuck them on the roof. We then obtained old styrofoam headstones from someone getting rid of old haunted house props. The styrofoam ones are also painted in flourescent paint and are balanced on a cardboard box lid. We then began to make our own tombstones with cardboard. Only two were made with cardboard and after a good rain, one was destroyed. The next year we found some old scrap wood and made new ones. Scrap wood is nice for making tombstones in the shapes of crosses and to make small tombstones to place among the larger ones. To save money, we had friends make their own tombstones and donate them to our cemetary. They could use any materials and decorations they wanted to. This made Halloween more fun for our guests and cheaper for our decorations.
Transformation Box
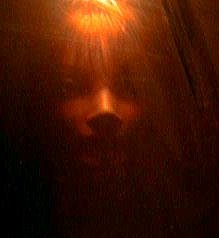
Since the Transformation box is more complex than some of the other props, it is much too difficult for me to give instructions on. If you would like to build one, you are welcome to visit The Horror Dome . This is the site that we got our instructions from.How It Works:
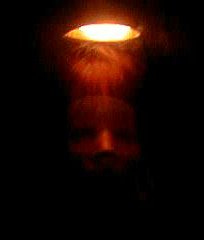
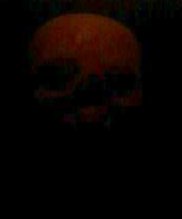
The basic premise of the box is based on reflection. Looking at a large window during a sunny day lets you view what is outside, but looking out the same window from a brightly lit room at night only shows you a reflection of yourself. This is how the box works. As you can see from the images, the first shows the head of a woman. The second image shows the head as well as some of the reflection of a second object, a skull. The third shows just the skull. Please keep in mind that photographs to no justice for this great prop. It is difficult to capture a dimly lit reflection with a plain old camera. Even so, seeing it for yourself is much creepier than any image I could put up of it.
 |
 |
 |
PVC Pipe Characters (Wolfman and Satan)

PVC Items Needed (all are 1 inch in thickness):
2 ten foot tall poles ($1.50)
1 cross bar ($1.37)
1 T Bar ($.36)
8 Elbows (angles can be 45 or 90 degrees) ($.28 -.48)
Items Used for Wolfman:
Wolf Mask ($12)
Foam Wig Head ($3.50)
Old Shirt and Old Pants ($0)
Old Brown Gloves, Glue, Fake Fingernails, Fake Hair ($4.50)
Thin Peice of Wood ($?)
Old Pillow ($0)
Garbage Bags, Duct Tape, Balloons ($0-5)
Costs are based on what I paid for an item. Items with $0 next to them are items that I had lying around the house already and did not have to purchase. The more you improvise, the cheaper the prop will be!
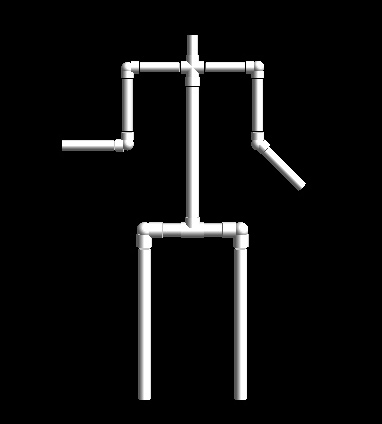
Measure the PVC Poles to the size you want for your Character. The numbers I give will be general guidelines, feel free to adjust them as you see fit. Mine were chosen to give the character height of an average person as well as make the best use of the poles used. With the measurements given, 4 PVC poles should make 3 characters.